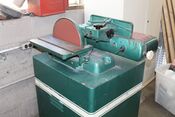
Powermatic Belt and Disc Sander (Model 30A)
| Powermatic Belt and Disc Sander (Model 30A) | |
|---|---|

| |
| Name | Powermatic Belt and Disk Sander |
| Zone | Machine Shop
|
| Owner | i3Detroit |
| Make Model | Powermatic/Model 30A |
| Part Number | S/N 230A223 |
| Date Acquired | |
| Storage Location | Machine Shop |
| Authorization Required | No |
| Status | Running |
| Value | $355.00
|
| Documentation | File:Powermatic 30A Sander User Manual.pdf |
| Other References | |
Intro
This sander is only for use on metal and other non-wood materials. It can be used for sanding straight edges and outside curves.
Rules
- Read, understand and follow safety instructions found in the users manual
- Materials, This sander is not for wood, only use on metal and some plastics or composites
- Belts and Discs Do not attempt to use this machine with worn or damaged belts or discs. They must be replaced before use according to the users manual. Replacement discs and belts are stored nearby. Use a heat gun (from the Tool Crib) to soften the disc adhesive and peel the worn disc off the backing plate. Then use a plastic scraper and acetone to remove any remaining adhesive and bits of the old sanding disc from the backing plate. Do NOT use a metal scraper; it damages the backing plate.
- Eye Safety is required using approved safety shield, glasses, or goggles (common eye glasses are not approved)
- Personal Protection. Before operating the machine, remove tie, rings, watch and other jewelry and roll up sleeves above the elbows. Remove all loose outer clothing and confine long hair.
- Airborne Particles An internal dust collection system has been enabled; however, wearing a mask while operating the sander is still a good idea to protect against inhaling airborne particles.
- Guards: Keep the machine guards in place at all times when the machine is in use.
- Work Area: Keep the floor around the machine clean and free of scrap material, metal dust, oil and other liquids to minimize the danger of tripping or slipping. Brush any dust and debris from the machine and sweep/vacuum the area after use.
- Belt and Disc Direction. Proper belt direction is from the idler pulley towards the drive pulley. Proper disc rotation is counterclockwise facing the disc. CAUTION: Sand on the LEFT hand section of the disc from the center to the left edge. DO NOT use the right hand portion for sanding.
- Hand safety. Keep fingers and hands away from the belt or disc. DO NOT clear metal dust from the table with the hands; use a brush. On small or thin parts, use a push stick or jig to keep the hands from contacting the abrasive. If using the optional fence, avoid getting fingers too close to the fence to prevent pinching. Never wear gloves while operating the sander.
Instructions
This is a shop class safety tutorial for a wood shop sander but also applies to the Powermatic in the Machine Shop... Powermatic Belt and Disc Sander Tutorial
Maintenance Info
12" Sanding Disc
6" x 48" Sanding Belt
Check dust collection pail inside cabinet at least once a month to see if it needs to be emptied.
FAQ
ToDo
1. Add/enable dust collection system for the machine. -- Done
2. Make a butterfly valve for the disc vacuum line.
3. Add disc and belt direction arrows.
4. Replace belt guard nuts with knobs for easier removal and replacement.
5. Replace missing and broken adjustment knobs.
6. Add miter gauge to disc sander bed. -- Done
7. Find at i3 or buy heat gun for changing sanding discs. -- Tool Crib