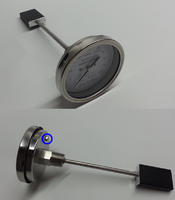
Laser Power Meter
| Laser Power Meter | |
|---|---|

| |
| Name | Laser Power Meter |
| Zone | Laser Cutter
|
| Owner | i3Detroit |
| Make Model | Mahoney Simplified Devices |
| Part Number | |
| Date Acquired | 2015-09 |
| Storage Location | Laser Zone grey storage drawers |
| Authorization Required | Yes |
| Status | Running |
| Value | $100
|
| Documentation | |
| Other References | Amazon listing: http://a.co/4F21jqZ |
Contents
Intro
This is an analog power meter for use with CO2 or YAG (10.6 or 1.064 micron) lasers up to 200W.
Rules
- Do not use the power meter unless you have been trained to use it. Training should take less than 5 minutes, so please ask if you're interested.
- Do not place the power meter in the path of a focused laser beam. This can damage the probe. If you are placing the power meter below the cut head of the laser, you must remove the lens first.
- Do not touch the black end of the probe after the laser has been fired at it. It gets really hot from a 150W laser.
Instructions
- Using a 1/4" hex drive, turn the screw (blue circle in photo) on the back of the meter until the dial reads 0W.
- Be careful to handle the black probe end as little as possible. Prolonged contact with heat can easily raise the meter to 5-10 Watts.
- Place the probe in the path of the unfocused laser beam.
- Fire the laser at full power for 15 seconds.
- Caution: the black probe will be hot enough to burn you. You may now remove the probe from the laser by grabbing it by either the dial or the silver shaft.
- Wait 25 seconds after the laser firing and then read the dial for the measured wattage.
- If making multiple measurements, it is suggested to let the meter cool to room temperature. You can accelerate this by putting the black end under running water or dunking it in a cup. Please do not submerge the dial end! Remove the probe from the water when it still reads 20-40 Watts because the heat transfer doesn't reach the meter instantly and it's easy to accidentally cool it below room temperature.
- Once the probe dial has returned to near zero, you can use the hex drive to completely re-zero the probe and make your next measurement.
The above timing sequence can be conveniently controlled with a simple laser program.
- Create two horizontal lines of different colors, end to end, one 7.5mm long and the other 12.5mm.
- Set the speed of both to 0.5 (yes, extremely slow)
- Set the power of the 7.5mm line to 100 and the 12.5mm line to 0.
- Set the origin at the free end of the 7.5mm line.
This will result in the laser firing for 15 seconds while the head only moves 7.5 mm (since 7.5mm/(0.5mm/s) = 15s), which is conveniently shorter than the length of the meter probe. The program will finish running after another 25 seconds, at which time you read the measurement.
Maintenance Info
Should not require any maintenance.
FAQ
Q: How precise and accurate is the probe?
A: No data on this is available from the manufacturer. The probe is marked in 2W increments, precision is limited by that. Measurement technique and ambient temperature may affect results. When making multiple repeated measurements (cooling back to room temp. in between), results are fairly consistent, only varying by 1-5 Watts out of a maximum of 150W.
ToDo
Authorized Users and Trainers
| Trainer Name | Certified Date |
|---|---|
| Mike Fink | 11/25/2016 |
| User Name | Authorized By | Date of Most Recent Training |
|---|---|---|
| Mike Fink | Mike Fink | 11/25/2016 |
| Roger Slykhouse | Mike Fink | 11/25/2016 |
| Amelia Meyer | Mike Fink | 11/25/2016 |