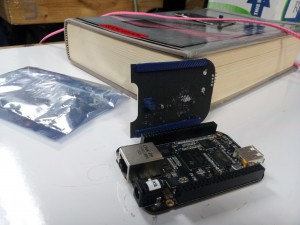
pre-fab PCB sizing testing
Ready to send a PCB off to the board house, but don’t want to wait two weeks and spend thirty dollars to get back a board that doesn’t fit where it’s supposed to? Another use for 3D printing emerges!
Seen in the background, parts that don’t fit. Acceptable substitutes found, hooray!
First print out both sides of the board on regular paper, ensuring the print is 1:1, and that you’ve mirrored the back side. Cut the board outline on one of the sheets of paper and glue it to some sort of cardstock (I used an Elmer’s glue stick). Cut the cardstock and back side, then line up and glue the back side to the cardstock.
If you have any real through-hole parts, you can drill holes though the (dried!) paper sandwich and mount them. If you have any real SMT parts you’re worried about placement of, and that you can spare one to test, you can glue them to the board.
The underside of my test card, showing (if you squint) a 3d-printed fake capacitor, and an approximation of the spacer part of the mezzanine connectors.
If you have neither, or you’re impatient like me and you want to finish your board design before your parts arrive, you can 3D-model the part, print it, and glue that to the test card. In this particular instance, I’ve printed a tallish capacitor I was concerned wouldn’t fit between the two boards, and, since I didn’t feel like drilling 92 holes through the board, I printed the spacer parts of the two mezzanine connectors. The Rostock is pretty good at doing accurate sizing in the Z dimension, so the dimension you care about should be upright in your print, if possible (sandpaper and callipers otherwise).
If the thickness of your PCB is a concern, you’ll have to add some of your own creativity (or 3D print that, perhaps).


Trackbacks & Pingbacks
[…] The usual solution to this problem is printing the board to be fabbed on a piece of paper, take some calipers, and measure very, very carefully. Extra points for sticking a few components you’re worried about to the paper before lining the mechanical prototype up to the existing board. [N8VI] over at the i3 Detroit hackerspace had a better idea – print the whole thing out on a 3D printer. […]
[…] It's a great and potentially very time-saving idea for working with overly complex builds. The only problem is 3D printing the actual boards, that can be a bit problematic to accurately design the first time. But if you’re regularly running into problems with PCBs, it might be worth the investment. Check out Brad’s success for more inspiration. […]
[…] The usual solution to this problem is printing the board to be fabbed on a piece of paper, take some calipers, and measure very, very carefully. Extra points for sticking a few components you’re worried about to the paper before lining the mechanical prototype up to the existing board. [N8VI] over at the i3 Detroit hackerspace had a better idea – print the whole thing out on a 3D printer. […]
[…] The usual solution to this problem is printing the board to be fabbed on a piece of paper, take some calipers, and measure very, very carefully. Extra points for sticking a few components you’re worried about to the paper before lining the mechanical prototype up to the existing board. [N8VI] over at the i3 Detroit hackerspace had a better idea – print the whole thing out on a 3D printer. […]
[…] The usual solution to this problem is printing the board to be fabbed on a piece of paper, take some calipers, and measure very, very carefully. Extra points for sticking a few components you’re worried about to the paper before lining the mechanical prototype up to the existing board. [N8VI] over at the i3 Detroit hackerspace had a better idea – print the whole thing out on a 3D printer. […]
[…] The usual solution to this problem is printing the board to be fabbed on a piece of paper, take some calipers, and measure very, very carefully. Extra points for sticking a few components you’re worried about to the paper before lining the mechanical prototype up to the existing board. [N8VI] over at the i3 Detroit hackerspace had a better idea – print the whole thing out on a 3D printer. […]
[…] The usual solution to this problem is printing the board to be fabbed on a piece of paper, take some calipers, and measure very, very carefully. Extra points for sticking a few components you’re worried about to the paper before lining the mechanical prototype up to the existing board. [N8VI] over at the i3 Detroit hackerspace had a better idea – print the whole thing out on a 3D printer. […]
[…] The usual solution to this problem is printing the board to be fabbed on a piece of paper, take some calipers, and measure very, very carefully. Extra points for sticking a few components you’re worried about to the paper before lining the mechanical prototype up to the existing board. [N8VI] over at the i3 Detroit hackerspace had a better idea – print the whole thing out on a 3D printer. […]
[…] The usual solution to this problem is printing the board to be fabbed on a piece of paper, take some calipers, and measure very, very carefully. Extra points for sticking a few components you’re worried about to the paper before lining the mechanical prototype up to the existing board. [N8VI] over at the i3 Detroit hackerspace had a better idea – print the whole thing out on a 3D printer. […]
Leave a Reply
Want to join the discussion?Feel free to contribute!