Creating Anorak’s Adventure
With the upcoming release of the Ready Player One movie, a few of us at i3 decided to do a ‘simple’ hack to the Atari 2600 game Adventure as a tribute to the book that we enjoyed. The thrust of the story concerns a retro themed easter egg hunt using popular culture from the ’70s, ’80s, and ’90s. The prize is ownership of a large and profitable company (as dictated in the will of the owner – the titular Anorak). The culmination of this hunt involves a reference to the first video game easter egg ever, Warren Robinett’s name hidden in Adventure, a video game he wrote for Atari at a time that they refused to credit programmers for their work. What we did is modify this game (running on real hardware) to act in the same way the version played by the main character, Wade Watts, did at the end of Ready Player One. We, of course, needed to tell someone about what we did, so who better than the original creator of the game and the writer of the book that this tribute is for?
This game will be demonstrated at i3Detroit’s open house on March 24th, 2018 and a picture of the person who finds the easter egg will be tweeted out with a link to this post on how it was accomplished. Below is the explanation of how we did it. The four people involved in the different steps to make this whole chain of events work each wrote a section.
Atari code modification
by: Frank Palazzolo
It took a series of steps to carefully transform Warren Robinett’s classic Adventure into Anorak’s Adventure. It sounds fairly straightforward – replace Warren’s signature with an egg sprite, and then do something special when you run into it. Let’s see what it took to do this.
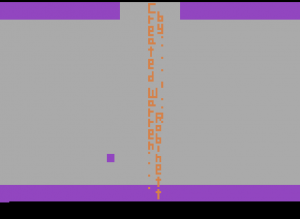
First of all, I (Frank) started from the really great disassembly listing found on bjars.com/ Downloading the venerable DASM assembler, I was able to reassemble the .asm into a .bin which exactly matches the original. This meant I could start from fairly well-documented 6502 assembly code instead of just a binary – a much easier proposition. At this point, I also grabbed the Stella emulator so I could test changes in there, without burning EPROMs for every test.
Getting down to business I quickly realized – you can’t test code changes until you find the secret room, which takes a while! I decided to temporarily changed the game to _start_ in the secret room, which would make testing much easier.
Warren Robinett’s code is very well designed, with many things defined in tables. For example, each room has a one byte id. It was easy to find the starting room (Yellow Castle, $11) and replace that code byte with the one for the secret room ($1E). Now I could start changing things for real.
;       LDA #$11       ;Get the yellow castle room.
       LDA #$1E       ;Start with the secret room.
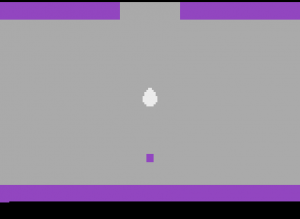
Referring to Ready Player One (as we did multiple times) we needed to replace the sprite data for the signature with a “large white oval with pixelated edges”
These objects can be 8 pixels wide, and arbitrary height, up to the limit of ROM space. (In fact, a zero byte marks the end of the sprite, which is why Warren’s signature is kinda funky looking -  There is no row without a pixel.) In addition, the signature takes up 95 bytes of ROM space, so replacing it with an 8x9 pixel egg saves space 95-9 = 86 bytes, which we can use to add more functions.

       .byte $18                  ;   XX
       .byte $3C                  ;  XXXX
       .byte $7E                  ; XXXXXX
       .byte $7E                  ; XXXXXX
       .byte $FF                  ;XXXXXXXX
       .byte $FF                  ;XXXXXXXX
       .byte $FF                  ;XXXXXXXX
       .byte $7E                  ; XXXXXX
       .byte $3C                  ;  XXXX
       .byte $00
The signature was “color cycling”, so now we have an egg that is doing the same. This is controlled by a “color” entry in the object table entry for each object. This is another easy change to switch the color byte from “cycling” to “white”. Finally, the egg is at the middle-top of the screen, when the signature started, and we want it in the very middle. The object table contains a pointer to the location info for the sprite. In this case, the signature object location is fixed, so the pointer points to another ROM location with the X and Y location. A little tweaking and the egg is in the middle of the screen.
; Object entry for egg
 LFF68:       .byte <AuthorInfo,>AuthorInfo,    (Pointer to location)
                    <AuthorCurr,>AuthorCurr,
                    <AuthorStates,>AuthorStates,
                    $0E, (Color, was $CB)
                    $0E, (Color in B&W mode, was $06)
                    $00 (Size)

 AuthorInfo:
        .byte $1E,$4D,$40          ;Room 1E, (X was $50, Y was $69)
The next problem – when the player runs into it the egg – nothing happens. The book clearly indicates we need the sound of “picking up” the egg, and then we need to trigger the alternate “endgame” when this happens. As it turns out – if an object is deemed “carriable”, then the player will drop it’s current carried object (if any) and you will pick up this object, accompanied by the sound we want. A little debugging in Stella isolates the issue – this object is not “carriable”. If we can make it “carriable”, we get some proper behavior for free.
But which objects are carriable? This was a little tricky to sort out, there is no attribute for this in the table. More debugging and I found the answer – there is a hardcoded index into the table. For objects in the first part of the table, they are not carriable, Past a certain entry, they are all carriable. The signature table entry is near the beginning of the table – I just needed to move the signature table entry into the other section. I moved it to beginning of the carriable section, and move the “carriable” offset back by one entry to point to it.
; Object Table
LFF4D:       .byte <PortInfo1,>PortInfo1,    $C8,$00, <PortStates,>PortStates,          $00,$00,$00 ;#1 Portcullis #1 Black 09
LFF56:       .byte <PortInfo2,>PortInfo2,    $C9,$00, <PortStates,>PortStates,          $00,$00,$00 ;#2 Portcullis #2 Black 12
LFF5F:       .byte <PortInfo3,>PortInfo3,    $CA,$00, <PortStates,>PortStates,          $00,$00,$00 ;#3 Portcullis #3 Black 1B
LFF71:       .byte <NumberInfo,>NumberInfo,  $DD,$00, <NumberStates,>NumberStates,      $C8,$00,$00 ;#5 Number Green 2D 24
LFF7A:       .byte $A4,$00,                  $A8,$00, <DragonStates,>DragonStates,      $36,$0E,$00 ;#6 Dragon #1 Red 36 2D
LFF83:       .byte $A9,$00,                  $AD,$00, <DragonStates,>DragonStates,      $1A,$06,$00 ;#7 Dragon #2 Yellow 3F 36
LFF8C:       .byte $AE,$00,                  $B2,$00, <DragonStates,>DragonStates,      $C8,$00,$00 ;#8 Dragon #3 Green 48 3F
LFF68:       .byte <AuthorInfo,>AuthorInfo,  <AuthorCurr,>AuthorCurr, <AuthorStates,>AuthorStates,      $0E,$0E,$00 ;#4 Name Flash 24 48
LFF95:       .byte $B6,$00,                  <SwordCurr,>SwordCurr, <SwordStates,>SwordStates,        $1A,$06,$00 ;#9 Sword Yellow 51
LFF9E:       .byte $BC,$00,                  <BridgeCurr,>BridgeCurr, <BridgeStates,>BridgeStates,      $66,$02,$07 ;#0A Bridge Purple 5A
LFFA7:       .byte $BF,$00,                  <KeyCurr,>KeyCurr, <KeyStates,>KeyStates,            $1A,$06,$00 ;#0B Key #01 Yellow 63
LFFB0:       .byte $C2,$00,                  <KeyCurr,>KeyCurr, <KeyStates,>KeyStates,            $0E,$0E,$00 ;#0C Key #02 White 6C
LFFB9:       .byte $C5,$00,                  <KeyCurr,>KeyCurr, <KeyStates,>KeyStates,            $00,$00,$00 ;#0D Key #03 Black 75
LFFC2:       .byte $CB,$00,                  $CF,$00, <BatStates,>BatStates,            $00,$00,$00 ;#0E Bat Black 7E
LFFCB:       .byte $A1,$00,                  <DotCurr,>DotCurr, <DotStates,>DotStates,            $08,$08,$00 ;#0F Black Dot Light Gray 87
LFFD4:       .byte $B9,$00,                  <ChalliseCurr,>ChalliseCurr, <ChalliseStates,>ChalliseStates,  $CB,$06,$00 ;#10 Challise Flash 90
LFFDD:       .byte $B3,$00,                  <MagnetCurr,>MagnetCurr, <MagnetStates,>MagnetStates,      $00,$06,$00 ;#11 Magnet Black 99
LFFE6:       .byte $BC,$00,                  <NullCurr,>NullCurr, <NullStates,>NullStates,          $00,$00,$00 ;#12 Null
At this point, I could run to the egg, and it made the pick-up noise! Unfortunately, I also began to hear the noises of a dragon trying to bite me! How is the egg trying to bite me? I went into some other rooms and found a dragon which was alive but standing perfectly still. Woops – looks like I broke something.
I had moved the table entry over the dragon objects, changing all of their offsets into the table. There must be hardcoded offsets for the dragons in the code, and now something thinks my egg is a dragon! I found the 3 places (one for each dragon) where the offsets needed to be changed in the code. Now, the dragons are working properly and the egg isn’t biting me anymore! This fix will forever be known as the “Here there be dragons” fix.
;       LDX #$36                ;Select Dragon #1 : Red
        LDX #$2D                ;Select Dragon #1 : Red

;       LDX #$3F                ;Select Dragon #2 : Yellow
        LDX #$36                ;Select Dragon #2 : Yellow

;       LDX #$48                ;Select Dragon #3 : Green
        LDX #$3F                ;Select Dragon #3 : Green
Now, I needed the endgame sequence. I found the place that checks for the end of the game, and added an additional check – am I carrying the egg? If so…what does the book say…”blinding white light, and Wade is now holding a silver chalice.” What can I do for this?
Well, there is only so much you can do with a 2600 – I simply write to the color registers – set everything to white except the egg, which is set to gray (closest thing to silver). Also, I set the game as “over” so that the game is frozen along with the colors.

Ok, there is one last step. We also want to trigger external events with the 2600. Per Evan’s suggestion, I use the unused pins on the 6532 (RIOT) chip, configure them as pull-down outputs, when we get the egg, and put them back to inputs when you hit reset or game select. It’s time to test this code with an LED and dropping resistor connected to +5. Lots of celebration as grabbing the egg turns on an LED!
Finally, we didn’t forget to undo the first change we did – restoring the game to start at the yellow castle. Now we do some playtesting, finding the secret room the old-fashioned way via the dot, and everything works quite well.
Upon later reflection, I decided to do two additional things – change the pins used for external I/O, and make a bigger egg.
Evan realized that, since Adventure only uses the left controller, we were free to use the pins on the right joystick controller instead of internal pins. A quick fix allows us to control external hardware without even cracking open the case.
The second change was a bit more involved, but I’m really glad I did it, as I uncovered a bug as well. Re-reading the text (again) it clearly says a “large” egg. At this point, ours looks a little small. I considered a cheap solution – a table entry which expands our object to four times bigger, but it really looks bad because it exaggerated the “blockiness” of our egg sprite. (Incidentally, the bridge object uses this feature, but it is made of all straight edges so it looks ok.)
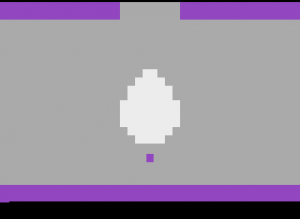
The other option was to split the egg into two sprites – a left half-egg and a right half-egg. This meant adding one new carriable object to the end of the table, using more rom space for the image, and triggering the end game if you pick up either left or right halves. A bit more work and we are almost out of ROM space, but it looks fantastic now!
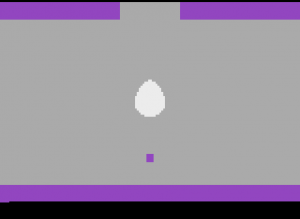
But, testing it out in Stella, something is wrong again. When I pick up the right half egg, the screen is turning orange! Some RAM corruption is happening when I pick up the egg half.
As it turns out, this bug is from way back when I made the first egg object “carriable”. When you pick up an object or move with it, the object’s location is changed to be “relative” to the player. But, if you remember, the pointer to the egg’s location is in ROM. We made the object “carriable”, but since it’s location is in ROM it is not “movable”. “Carriable” objects are assumed to be “movable”, with their location bytes in page zero RAM. The code doesn’t check for this though. Since we created a “carriable, but not movable” object, the code is updating a “random” page zero location, using the least significant byte of the ROM address instead.
The fix was simple. I added a check in the two places where objects are moved, to see if the MSB of the pointer to the object location is zero. If it is, it’s zero page, and the move can proceed. If not, I avoid the rest of the move routine. This simple change allows us to handle a “carriable but not movable” object properly, without memory corruption.
        LDA $97                 ;Set the object as being
        STA $9D                 ; carried.

+       LDA $94                 ;Get the high byte of the dynamics address
+       BNE NoObject            ;if this is not zero, position is not in ram, not really movable
        LDX $93                 ;Get the dynamics address low byte.
        LDY #$06
        LDA $99                 ;????
...
        BEQ MoveCarriedObject_2

        JSR GetObjectAddress    ;Get it's dynamic information.
+       LDA $94                 ;Get the high byte of the dynamics address
+       BNE MoveCarriedObject_2 ;if this is not zero, position is not in ram, not really movable
        LDY #$00
Now, we have a version of Adventure which is accurate to the book as we can make it. With apologies to Warren Robinett for removing his signature, we think it works pretty well and looks pretty cool. If you want to see the code or try the binary yourself, you can find it at my github (http://www.github.com/palazzol/AnoraksAdventure)
Atari Hardware Modification
by: Evan Allen
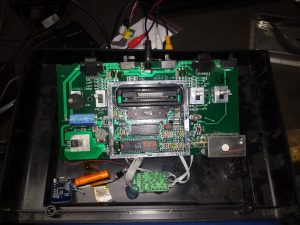
To get the hardware in a state that we can use it for this project the first thing I did was install a composite and S-video mod to the 2600. I have tried to build these in the past with limited success and decided that I would rather purchase one that I was confident would work and would give a good quality picture. I have considered that this is not quite as original as it could be to the book but for the sake of usability and the size of the available screens I had available it seemed prudent. Keep in mind this is still MY Atari 2600 and I was planning on doing this to it anyway as I would rather have a usable console than an original one (as you are going to find out we continue to make it less than original).
The kit I chose is one designed by The Longhorn Engineer mostly because it was available as a kit on ebay and I didn’t want to put much work into this portion of the build. The installation instructions are basically printed on the silkscreen so just wire it right up and away you go. I made sure to line up and step drill the video and audio ports so it would look decent considering I wasn’t using one of those monolithic block connectors that are found as board-mount components so often. The power plug was also switched from a headphone jack to a barrel jack because it’s just a better design and I can use basically any power adapter from 7-12 volts DC.
The next part of the mods would be actually developing the game on real hardware. I happen to have a vintage Atari 2600 EPROM cart that my mom had growing up, apparently video game piracy runs in the family, although it was much simpler when all you had to do was program a memory chip and you were good to go. I also have a bunch of chips that she had with this cartridge but none of them was Adventure (imagine that, one of the most common games and she had a real cartridge for that one) .
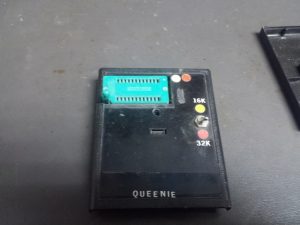
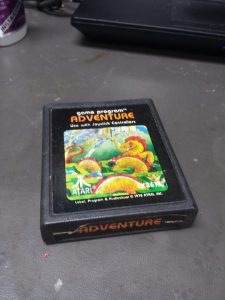
Once we had the game on the Dev cart it was time to actually package it, I purchased an Adventure cartridge with the Atari printed label (nice picture on it) as Ernest Cline uses that picture on his personal website so without a cannon source for which version of the game was being used in the book we chose this one. Unfortunately, after I purchased and before I got the game the previous owner drove a screwdriver through the label to open it, cleaned the pins with a q-tip (leaving cotton residue) and couldn’t figure out how to get the card edge connector door back on so they omitted it when sending the game. This means that the label is useless (which is what I bought the game for, otherwise I would just reprint it and use one of my existing games) and that I have no door on the bottom (helpful for engaging the matching door on the console). This turned out to not matter a lot as I needed to cut part of the plastic off to allow for the socket and EPROM to fit in the case meaning I wouldn’t be able to use the door anyway. I had to modify the board to accept a 27C32 EPROM because the pinout is slightly different (one pin is inverted). The label was reprinted using a reference photo to grab the text color and image from and a label maker intended for homebrew.
Now that we have a working, hacked, stock-looking game and a system that can play it I can move on to the actual modification that this custom code triggers. I came across the unused pins on the 6532 RIOT chip when I was attempting to build an Atari 2600 from scratch like Benjamin Heckendorn did because I wanted to better understand how the system was laid out. Since these pins aren’t used for anything else there should be no code that ever changes their direction from input to output and even the Atari 2600 programmer’s guide refers to them as ‘hardwired as input’ so I doubt anyone else has bothered to use these much before. With that in mind it seemed safe that my modification would have no effect on any other games played in this console and it would be safe to leave in forever.
Our implementation of this used the ESP8266 microcontroller which can be programmed by arduino and get on the wifi which is just what we needed. The Atari operates at 5 volts and the ESP uses 3.3v so a simple resistor divider lowered the voltage so as not to destroy our little wifi chip. This thing takes actually quite a lot of power so I decided it needed its own 1000uF capacitor and to be tapped right off the 7805 and not next to the logic chips on the board (when I did this it locked up the games periodically, so this was trial and error not me being cautious). So long as the pin on the ESP is not set to have a pull up the atari has no trouble driving the pin down and triggering the message to go out over wifi.
MQTT client
by: Mark Furland
The output pin on the 2600 is connected to an eps8266 d1 mini running i3’s multi-topic button code.
We have an automation ecosystem based around MQTT, with devices that publish and listen to MQTT, and homeassistant controlling those devices. Around half our devices are running tasmota, things like lights or fans, that don’t do more than one thing. Also the three way switch, but everything has exceptions. The other half of our devices are custom, as they need to do stuff like control three banks of lights, output to an LED sign, or log atmospheric data.
We currently have two build scripts to OTA the custom or tasmota devices. Both scripts are almost the same, but in desperate need of a rewrite due to the simple one line per device config files not holding enough complexity to easily specify all the different settings we have. Perl was a good choice when it was that simple, but I’m not interested in complex data structures in perl so we’re also jumping languages.
I hid all of the wifi and mqtt connection code every custom device has to do into a library. You just pass it the options struct with things like hostname and mqtt server, and it will call your callback functions when mqtt events happen and every loop.
There is an upcoming blog post more in depth about our IoT ecosystem.
Our MQTT command structure is basically just using what tasmota uses, as it makes sense and having all the custom stuff match is good.
<prefix>/<topic>/<command>
Where <prefix> is `tele`, `stat`, or `cmnd`.
`cmnd` is to control the device on that topic, `stat` is for the results of a command, and `tele` is for regular telemetry.
The multi-topic button works with topics that have the command`POWER and the data “ON” or “OFF”.
It currently has support for three topics, but we have the ability to add an arbitrary number of topics with a little bit of modification to the preprocessor bits near line 68.
Each topic has 5 associated pins, on button, off button, toggle button, on led, off led, just set it to -1 if it’s not used. So something like the disco ball controller only uses the on and off buttons, no toggle or LEDs.
The programming for the thing needs to live somewhere, as it’s not a permanent thing, so this is the chosen place.
#SET PIN MODE TO INPUT NOT INPUT_PULLUP
x   Atari2600   multi-topic-button  10.13.107.83 2C:3A:E8:32:8B:55   esp8266:esp8266:generic:UploadTool=esptool,CpuFrequency=80,FlashFreq=40,FlashMode=dio,UploadSpeed=115200,FlashSize=1M0,ResetMethod=ck,Debug=Disabled,DebugLevel=None____ i3/atari2600 -DTOPIC_0_TOPIC=\"i3/atari2600/easter\"shorts
Home Assistant
by: Mike Fink
Home Assistant watches MQTT for the esp8266 in the atari to publish that the egg has beeen found. When that happens, it executes a script that wgets a snapshot from a hikvision IP camera, and then Home Assistant sends out a tweet with that image attached. The snapshot is taken by a home assistant shell_command that executes ‘wget -o /path/to/file/snapshot.jpg http://user@pass:xxx.xxx.xxx.xxx/Streaming/channels/1/picture’. A twitter notification then sends out the tweet through our twitter account with the image attached.
It’s not a very complicated setup (though silly and way overcomplicated for our end goal), but there was initially some difficulty trying to get the notification service to pull a snapshot directly from the camera’s URL, hence why a snapshot is taken with wget as an intermediate step. All of the relevant Home Assistant code/config should be in this commit: https://github.com/i3detroit/homeassistant-config/commit/5c47494b02aba9887bb2a2174660f61756ca57f9
Here is our tweet triggered by all this: https://twitter.com/i3Detroit/status/977598500342026240

Trackbacks & Pingbacks
[…] Go to Link: https://www.i3detroit.org/creating-anoraks-adventure/ […]
Leave a Reply
Want to join the discussion?Feel free to contribute!