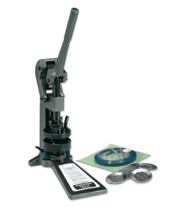
Button Maker
NOTE: THIS EQUIPMENT IS GONE. I3 DOES NOT HAVE THIS ANY LONGER.
| This page contains historical information. It is provided for reference but does not reflect current information or policy. |
This page has been removed from search engines' indexes.
| Button Maker | |
|---|---|

| |
| Name | Button Maker |
| Zone | Craft Room
|
| Owner | i3Detroit |
| Make Model | 1 1/4" Badge-A-Matic |
| Part Number | |
| Date Acquired | |
| Date Departed | NO DATE DEPARTED |
| Storage Location | |
| Authorization Required | No |
| Status | Departed |
| Value |
|
| Documentation | |
| Other References | |
Intro
The button maker in the shop is a "1 1/4" Badge-A-Matic" made by "Badge-A-Minit". If the Button Shells, Pinbacks, and plastic covers are all gone, more can by found from 3rd party providers for much less then Badge-A-Minit sells. Just make sure they say they fit Badge-A-Matic. USA Buttons is a good place to look.
Rules
Instructions
To create a button:
- Get art work. If you have specific art work you want turned into a button, use this template to help you make the correct size. The outside edge is what will be cut, the dotted line is what will be shown on the badge it's self. Media:125-button-layout.pdf
- Cut out the art work. You will find in one of the button boxes and red circular cutter. Place the cutter so that the 4 white dots on the clear plastic part are touching the edge of template outline(or if you are cutting random images, that most of the image is inside these dots). Then using the handle, press down with even force and turn. It might take a few tries to get good at it.
- Place the parts into the Badge A Matic.
- The pin back goes in with the zig zag facing up and the loopy side to the left.
- The shell goes in with rounded side up.
- The the artwork goes in with top of art work facing away from you.
- The clear plastic piece goes on top of everything else.
- Press the artwork and plastic around the shell:
- With the badge-a-matic set to setting 1, press down on handle until you hear it click. You do not need great force; the more force you use, the greater chance it will actually break the shell
- Press the shell into the pin back.
- The pin back needs to be down inside the hole. If it stayed up with the shell, grab it and put it back in place.
- Move the lever to position 2 and gently pull down on the handle. Again, force is not required. you just have to pull down until the top and bottoms touch.
- Eject the button with the ejector tab in the back.
- If ejector tab does not push the button out, pull down on the handle while in position 2 again using a tad more force. ejector tab needs regular lubrication or else action will get very rough.
Maintenance Info
FAQ
ToDo